> ## Documentation Index
> Fetch the complete documentation index at: https://docs.solanamobile.com/llms.txt
> Use this file to discover all available pages before exploring further.
# Expo dApp Setup
> [Expo](https://expo.dev/) is a popular open-source platform that simplifies the development, building, and deployment process for React Native applications. Expo apps have their own managed development flow and utilize the Expo SDK.
export const Button = ({href, children}) => {
return
;
};
**TIP**
All React Native guides and tutorials for the Solana Mobile SDKs **are all applicable for Expo as well**! After the initial setup, the development of an Expo app and a React Native app are very similar.
## Expo Starter Template
The quickest option to get started with Expo development is using the [Solana Mobile Expo dApp Template](/react-native/expo-dapp-template). Run a single CLI command to initialize an Expo app with pre-installed Solana libraries and UI components.
Initialize the template with:
```bash theme={null}
yarn create expo-app --template @solana-mobile/solana-mobile-expo-template
```
Then follow the [*Running the app*](#running-the-app) guide below.
## Manual Installation
If you want to create a new Expo project from scratch then follow these steps. If you want to integrate an existing project with the SDK, then skip to [installing the dependencies](#step-2-install-dependencies).
As a prerequisite, follow the [React Native official documentation](https://reactnative.dev/docs/environment-setup) and set up your environment for Android.
#### Step 1 - Initialize a new Expo project
```shell theme={null}
npx create-expo-app
```
Enter your app project name then move into the newly generated folder.
#### Step 2 - Install dependencies
```shell yarn theme={null}
yarn add \
@solana/web3.js \
@solana-mobile/mobile-wallet-adapter-protocol-web3js \
@solana-mobile/mobile-wallet-adapter-protocol \
react-native-get-random-values \
buffer
```
```shell npm theme={null}
npm install \
@solana/web3.js \
@solana-mobile/mobile-wallet-adapter-protocol-web3js \
@solana-mobile/mobile-wallet-adapter-protocol \
react-native-get-random-values \
buffer
```
* `@solana-mobile/mobile-wallet-adapter-protocol`: A React Native/Javascript API enabling interaction with MWA-compatible wallets.
* `@solana-mobile/mobile-wallet-adapter-protocol-web3js`: A convenience wrapper to use common primitives from [@solana/web3.js](https://github.com/solana-labs/solana-web3.js) – such as `Transaction` and `Uint8Array`.
* `@solana/web3.js`: Solana Web Library for interacting with Solana network through the [JSON RPC API](https://docs.solana.com/api/http).
* `react-native-get-random-values` Secure random number generator polyfill for `web3.js` underlying Crypto library on React Native.
* `buffer` Buffer polyfill also needed for `web3.js` on React Native.
#### Step 3 - Update App.js with polyfills
**For Expo SDK 48 and below**
For basic Expo apps, the entrypoint file is usually in the root of the project (i.e: `App.js`, `App.tsx`, `index.js`).
Add the following two lines to the top of the entrypoint file:
```javascript theme={null}
import "react-native-get-random-values";
import { Buffer } from "buffer";
global.Buffer = Buffer;
```
##### For Expo SDK Version 49+ and Expo Router
If using Expo Router *and* Expo SDK Version 49+ the entrypoint and polyfill setup is different. See the specific instructions below.
If you are using Expo SDK Version 49+ and Expo Router, the `expo-crypto` package will replace `react-native-get-random-values` and you'll create your own entrypoint file for polyfilling.
#### Install expo-crypto
`expo-crypto` is an official SDK by Expo that provides the polyfill functionality we need for libraries like `@solana/web3.js`. See official
docs for [installation instructions](https://docs.expo.dev/versions/latest/sdk/crypto/).
```shell theme={null}
npx expo install expo-crypto
```
#### Entrypoint file polyfills
In the root of your project create a new entrypoint file (i.e `index.js`). In this new file,
you can initialize the polyfills at the top of the file.
In this case, we polyfill the global `Crypto` object with `getRandomValues` from `expo-crypto`.
Paste the following code:
```javascript expandable theme={null}
// index.js
import { getRandomValues as expoCryptoGetRandomValues } from "expo-crypto";
import { Buffer } from "buffer";
global.Buffer = Buffer;
// getRandomValues polyfill
class Crypto {
getRandomValues = expoCryptoGetRandomValues;
}
const webCrypto = typeof crypto !== "undefined" ? crypto : new Crypto();
(() => {
if (typeof crypto === "undefined") {
Object.defineProperty(window, "crypto", {
configurable: true,
enumerable: true,
get: () => webCrypto,
});
}
})();
import "expo-router/entry";
```
Then at the end, import `"expo-router/entry"` to ensure the app is using Expo Router.
#### Update package.json entrypoint
Lastly, in `package.json`, update the `main` field to point to the new entrypoint file.
```json theme={null}
// Old entrypoint
{
"main": "node_modules/expo/AppEntry.js"
}
// New entrypoint
{
"main": "index.js"
}
```
#### Step 4 - Build and run the app
Now the project is properly installed and configured, all that's left is to build a custom development APK, install it, then launch the Expo dev client.
Follow the steps on the next section.
### Running the app
#### Custom Development Build
The traditional [Expo Go](https://github.com/expo/fyi/blob/main/whats-in-the-sdk.md) development flow is only limited to certain hand-picked modules and does not support further customized native code, which Solana Mobile SDKs need.
Instead, we'll need to use a [custom development build](https://docs.expo.dev/develop/development-builds/create-a-build) which makes Solana Mobile React Native libraries (i.e Mobile Wallet Adapter) fully compatible with Expo.
Full steps of building and running a custom development build below.
#### Local vs EAS builds
The `eas build` command deploys a job to the EAS Build service that builds your APK using Expo's build infrastructure.
You can also run the build process locally by adding the `--local` flag that runs, which builds and generates the APK on your computer. You'll need Android Studio and Java correctly setup for this step.
See the Expo official documentation for [local builds](https://docs.expo.dev/build-reference/local-builds/).
**Build with eas build**
You can use Expo's build service to build your app with no development environment setup required. Make sure you have an Expo account and have logged in with `expo login`.
In the project directory, run the command:
```shell theme={null}
npx eas build --profile development --platform android
```
After it's finished building you should receive a QR code and download URL to the `apk` of your app. You can download this to your emulator/device.
**Prerequisites**
Before building locally, follow the [*React Native CLI Quickstart* guide](https://reactnative.dev/docs/environment-setup) to set up your development environment.
After following the guide, you should:
* Install and use the recommended JDK 17
* Install and configure Android Studio
* Set your `JAVA_HOME` and `ANDROID_HOME` environment variables
**Configure `eas.json`**
Ensure your development profile has the `developmentClient` field set to true.
```json theme={null}
"development": {
"developmentClient": true,
"distribution": "internal"
},
```
**Build locally**
Run the build locally with the specified profile and `--local` flag.
```shell theme={null}
npx eas build --profile development --platform android --local
```
**Incorrect JDK version or Missing Android SDK**
Follow the [React Native CLI setup instructions](https://reactnative.dev/docs/environment-setup) to make sure your local environment is setup for Android development.
You'll need:
* JDK version 11
* Android SDK installed and configured through Android Studio SDK Manager
* ANDROID\_HOME environment variable
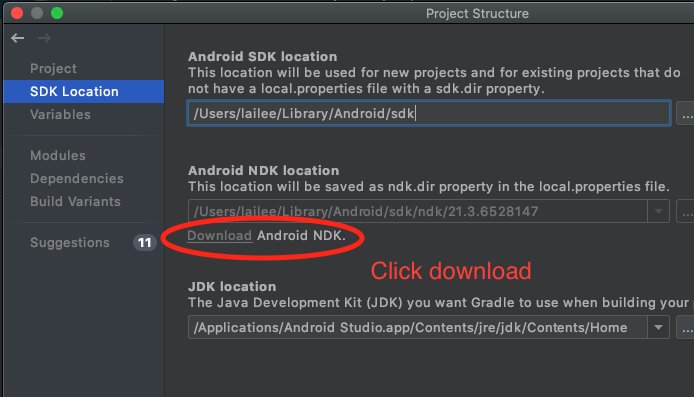
#### Missing Android NDK
If you are seeing errors about missing Android NDK, make sure you've installed Android NDK in Android Studio. You can do this following:
`File -> Project Structure -> SDK Location -> "Android NDK Location" -> Download Android NDK`
#### Install the custom development build APK
After successfully building locally, the APK should be generated and outputted to the same directory you ran the command. Install that APK into your device/emulator (drag and drop APK file into emulator).
#### Run the app
At this point, the APK should be installed onto your emulator or device. You can launch the app and connect it to the development client with:
```shell theme={null}
npx expo start --dev-client
```
This will launch the template app and you can select the newly created development server. Now you can edit your code and see changes reflected immediately!